
As photographers, videographers and YouTubers, we need support. And no I’m not talking about sports bras or underwear. I’m talking about tripods.
Let’s get stuck in!
Top 20 Best Tripods for All Budgets, Cameras & Uses
1. The Peoples Favourite

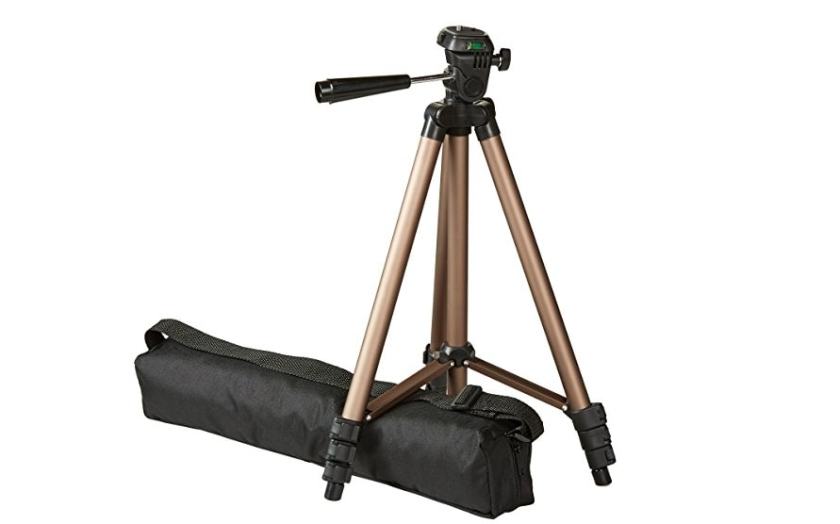
Dolica AX620B100 62-Inch Proline Tripod
Weight: 4 lbs
Collapsed Height: 22.5″
Extended Height: 62″
Maximum Load: 16.2 lbs
Kicking off our list of the best tripods is the uber popular and well rated Dolica AX620B100. Currently on Amazon, this model has over 2,700 reviews with an average rating of 4 stars. Not to shabby!
Because of these reasons, the Dolica AX620B100 easily earns a number one spot for being the peoples favourite for photography, video, YouTube and more! Dolica is also a well respected brand so you know you’ll get a high quality product!
2. Best Lightweight Travel Tripod

JOBY GorillaPod SLR Zoom
Weight: 0.75 lbs
Collapsed Height: 12.5″
Extended Height: 12.5″
Maximum Load: 6.6 lbs
Next up our list is the non-traditional and to be quite honest, weird look JOBY GorillaPod. But don’t let its octopus look put you off! In actual fact, this is one of the best lightweight travel tripods on the market as it comes in at under 0.75 lbs. A true light weight that packs a punch!
I highly reccomend this tripod for Vloggers, Bloggers, Travellers and carry on enthusiasts as its small footprint and adaptability is second to none.
3. Best Tripod For Video

Magnus VT-4000 Tripod System With Fluid Head
Weight: 7.9 lbs
Collapsed Height: 27.2″
Extended Height: 59″
Maximum Load: 8.8 lbs
In this modern day age, video is king. So if you are wanting to make your videos pop, using a tripod is an absolute must have! No questions asked!
If you plan on recording video that requires panning shots, tracking shots or tilting shots, this tripod might be the one for you. It also has a sturdy 59″ aluminium build and a load capacity of 8.8lbs so it can handle the biggest of DSLR cameras.
4. Best Budget Tripod
AmazonBasics 50-Inch Lightweight Tripod with Bag
Weight: 1.19 lbs
Collapsed Height: 16.5″
Extended Height: 50″
Maximum Load: 6.6 lbs
If you are on an extreme budget, don’t stress, I’ve got you covered! For my best budget tripod pick, I have gone with the Amazon Basics Lightweight Tripod which costs less than many meals at Five Guys. Seriously, this is one cheap tripod.
Also just because a tripod is “budget” doesn’t necessarily mean its an inferior product. My first ever tripod was a cheapo that lasted me over 2 years of good service.
5. Best Tripod For DSLR Cameras

Vanguard Alta Pro 263AB 100 Aluminum Tripod Kit
Weight: 5.8 lbs
Collapsed Height: 28″
Extended Height: 68″
Maximum Load: 15.4 lbs
If you are sporting an expensive DSLR camera, you want the confidence that your camera will be supported securely while giving you great crispy images. This is where the Vanguard Alta Pro 263AB 100 comes into frame (pun intended).
This is seriously one good tripod!
6. Best Tripod Under $50

Albott 70 Inch Tripod/Monopod
Weight: 3.6 lbs
Collapsed Height: 21″
Extended Height: 70″
Maximum Load: 8.8 lbs
As you can see from the title, this model has an ace up the sleeve in the way of Monopod functionality. That makes that $50 price tag all that much sweeter.
As far as the build quality is concerned on this tripod, it stacks up pretty well when compared to other tripods double or even three times the price. The Albott also has 70 inches of extension which is great for people over 6 feet.
7. Best Tripod Under $100

Manfrotto MKCOMPACTADV-BK Tripod
Weight: 3.3 lbs
Collapsed Height: 17″
Extended Height: 65″
Maximum Load: 6.6 lbs
Manfrotto is a brand I have come to love over the past 5 years of doing photography. In my experience their products are always of the highest quality irregardless if they are cheap or expensive. This Manfrotto MKC Compact is no exception!
8. Best Tripod Under $200

Manfrotto BeFree
Weight: 3.9 lbs
Collapsed Height: 17″
Extended Height: 59″
Maximum Load: 8.8 lbs
If you are the type of person who likes to buy the right thing once, this Manfrotto BeFree tripod might be the one for you. What you get for paying and extra $100 pays dividends in the way of a durable build quality and the supporting features.
One other little thing I appreciate about this tripod was the substantial legs grips and the bubble level so you can always shoot or record knowing you will be level with the horizon.
9. Best Carbon Fiber Tripod

ZOMEi Z669C Portable Carbon Tripod Monopod
Weight: 3.4 lbs
Collapsed Height: 14″
Extended Height: 6″
Maximum Load: 16.0 lbs
When compared to other tripods on this list, the ZOMEI Z669C tripod weights pretty similar, but its max load capacity is 16.0 lbs which is pretty remarkable for a tripod that only weighs 3.4 lbs!
Also just like all good tripods, this Zomei has an invertible central column, 5 twist lock legs, 360 degree metal ball head with level and it can also turn into a monopod! A true all rounder that wont break the bank!
10. Best Monopod For Sports Photography

SIRUI P-326 6 Section Carbon Fiber Monopod
Weight: 0.88 lbs
Collapsed Height: 15″
Extended Height: 60″
Maximum Load: 22 lbs
Photographing sports events whether it be your sons first football game or a professional hockey event is an extremely satisfying feeling. There is noting like getting back to your computer to see all these stunning action shot you were able to capture.
For this list I chose the SIRUI P-3266 Monopod as it’s extremely lightweight (0.88 lbs), carbon fiber construction, 22 lbs max load, affordable price tag and can be setup in seconds with its 6 twist leg lock construction. A must have!
11. Best Monopod For Wedding Photography

SIRUI SUP204SR Monopod
Weight: 3 lbs
Collapsed Height: 27″
Extended Height: 63″
Maximum Load: 17.6 lbs
For the best monopod for wedding photography and videography, I landed on the Sirui SUP204SR because of its unique 3 prong mini leg design and the ball head mechanism being ocated at the base of the monopod. This allows for 20 of degree movement which is great for quick composition changes and videography.
12. Best Tripod For Astrophotography

Dolica GX600B200 Proline GX Series
Weight: 3.4 lbs
Collapsed Height: 20″
Extended Height: 60″
Maximum Load: 15 lbs
Out of all the things I have ever captured with my camera, taking photos of the milky way galaxy is one of the most rewarding experiences I have ever had as a photographer. Also anyone with a camera and a tripod can get started!
This tripod also has a retractable central hook that is great for hanging a sand bag or a backpack for added stability. An extremely valuable tool for any photographer!
13. Best Tripod For Vlogging

Joby GorillaPod
Weight: 1 lb
Collapsed Height: 11.4″
Extended Height: 11.4″
Maximum Load: 6.6 lbs
There is no denying that Vloggers have taken the world by storm in the past 2 years. You don’t have to look far to see creators like Casey Neistat and Peter McKinnon have become extremely influential. Typically to get started Vlogging, you want a camera with a flip screen and preferably a tripod.
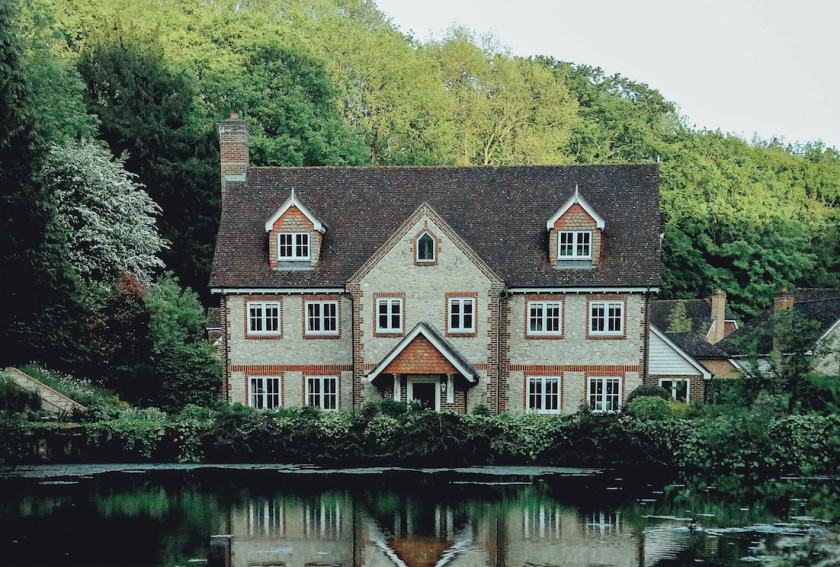
14. Best Tripod For Real Estate & Architectural Photography

Manfrotto MK290XTA3-3WUS 290
Weight: 5 lbs
Collapsed Height: 24″
Extended Height: 58″
Maximum Load: 8 lbs
A great way for amateur or professional photographers to make some income on the side is by undertaking architectural photography. You can easily use your existing gear plus some minor adjustments so you can shoot like a pro. However just like with each category of photography, capturing realestate also has its own individual needs.
15. Best Tripod For Landscape Photography

Vanguard Alta Pro 263AB Aluminum Tripod
Weight: 4.41 lbs
Collapsed Height: 24.75″
Extended Height: 65″
Maximum Load: 15.4 lbs
Capturing landscapes is the bread and butter for almost every photographer. It’s a great way to get outdoors while also being able to capturing stunning vistas and scenery. But what exactly is the best tripod of landscape photography?
16. Best Tripod For iPhones

Manfrotto Mini Tripod
Weight: 0.51 lbs
Collapsed Height: 5.31″
Extended Height: 5.31″
Maximum Load: 2.2 lbs
In the past couple of year smartphones users have started to take their onboard cameras more seriously. You don’t have to look far to see that latest iPhone X or Google Pixel 2 have stunning sensors that capture professional grade photos.
So just like a professional camera, an iPhone or smartphone also deserve their own tripod. The Manfrotto Mini Tripod is built for smartphones and has an extremely light quality build that can easily fit in your pocket! Folding the legs together also makes this tripod great for capturing videos with your iPhone.
17. Best Tripod For Hiking
Neewer Carbon Fiber 66″ Hiking Tripod & Monopod
Weight: 4.7 lbs
Collapsed Height: 21″
Extended Height: 66″
Maximum Load: 26 lbs
For my pick I came across the Neewer Carbon Fiber Tripod/Monopod which boats a wide range of features including a carbon fiber construction, twist lock legs, spiked feet, rubber grip and a ball head that provides a 360 degree range of motion. Combine these things together and you have one mighty tripod!
18. Best Tripod For GoPro

JOBY GPod Mini Magnetic
Weight: 1.4 oz
Collapsed Height: 6.7″
Extended Height: 6.7″
Maximum Load: 11.05 oz
Just like iPhones, GoPro’s also deserve their own tripods. We don’t leave out any cameras here at Tripodyssey. If you own a GoPro you know there are thousands of accessories for your camera but where to start?
19. Best Tripod For Overhead Shots

K&f Concept TM2534T Camera Tripod
If you are into capturing product shots or macro photography, there are certain tools thats can assist you in taking better photographs. While a tripod is a great place to start, having an extension or “boom arm” will allow you to shoot overhead whit the tripod getting in the way. The K&F Concept Tripod does this exact task with ease which makes it great for product shoots whether for eBay or an online store.
Weight: 4.2 lbs
Collapsed Height: 18″
Extended Height: 62″
Maximum Load: 22.0 lbs
20. Best Tripod For Beginners

AmazonBasics 60-Inch Lightweight Tripod
Weight: 2.7 lbs
Collapsed Height: 25″
Extended Height: 60″
Maximum Load: 6.6 lbs
Wrapping up my list of the best tripods for all cameras, budgets and uses is the AmazonBasics 60 inch tripod. This tripod has all the features you would expect from a high grade tripod but in a cheap package. While the build quality is not on par with a sub $100 tripod, it still does many of the same things. Just keep in mind it may not last as long.
Benefits Of Using a Tripod For Photography and Video
“And this Thing I saw! How can I describe it? A monstrous tripod, higher than many houses, striding over the young pine trees, and smashing them aside in its career; a walking engine of glittering metal…” – H G Wells – War of the Worlds

Tripods come in various sizes and configurations. Some are designed for specific purposes, like travel or studio use, some are versatile and adaptable for a multitude of situations and uses. What different situations are tripods most valuable in? Why should one be used, and what is the best way to set up and use one?
Here are a few situations to name a few whee a tripod can help your creativeness and control.
Long Exposure Photography
Astrophotography often has extremely long exposure times. Even short exposures, like of the Full Moon, will benefit from using a tripod. An ultra wide angle stopped down to a wide aperture, say f/2 or f/3, offers us the option of great depth of focus.
Nature Photography Subjects that come to my mind for this treatment are natural scenes where I want the background to be in sharp focus while having a foreground subject also in focus. Even in broad daylight, a small aperture and a low ISO will give me what I consider a marginally hand hold-able shutter speed.

Another popular use for long exposures is the blurring of moving water. Waterfalls, rapids, even the ocean are subjects that might spur your creativity for that effect, but you’ll need a tripod.
Architectural Photography
Architectural photography is another group of subjects that can give us amazing images with that huge depth of focus treatment. A tripod will also allow us to level out our camera perfectly. With ultra wide angle lenses, any little bit off level will be exaggerated greatly in the final image. Sure, I can fix it in post processing, but I feel it’s better to get it right in camera.
Panoramas
Since we’re talking about wide angle, I’ll go ahead and throw in panoramas as needing a tripod for best results. In order to get the stitching from one image to the next to line up properly, using a tripod becomes very important. Stitching can also be used to blend together multiple exposures for different end results.
HDR Photography
HDR photography practically cries out for a tripod. HDR isn’t just a gimmick for an artsy photographic look. It can also render a scene with complex exposure issues into a natural and pleasing final result. But again, if any of the multiple images used are out of alignment, the quality of the final result suffers.
Macro Photography
Macro (or micro) photography will often benefit from tripod use for multiple reasons. Smaller apertures create longer shutter speeds, extreme close up magnification also magnifies any camera shake, and composition can sometimes be a little tricky.
Sports & Wildlife Photography With Telephoto Lenses
Long telephoto lenses used for sports or wildlife images can sometime necessitate tripods. With active and moving subjects, maybe the compromise between hand held and tripods would be a good choice, the monopod. Again, the reason is camera shake.

At the high magnification levels of long telephotos, any camera shake can result in image blur that ruins the image. With today’s new crop of affordable ultra telephotos on an APS-C format digital camera, even budget conscious photogs can get results unheard of just a few years ago.
Product Photography
Keep the composition, lighting, exposure, even focus the same while changing out one product for the next. Maybe you have different colors of the same item, or different flavors, or whatever it is you’re selling online. Using a tripod ensures repeatable good results.
Portrait Photography
Same can be said about portraiture. Portrait photography can be very fluid, such as environmental portraits. Or, it can be more formal. The formal settings lend themselves to using a tripod, but the more fluid or active type of portrait settings can often benefit from using a tripod.
At a portrait studio, a photographer might standardize on a lighting arrangement, a posing area, and a camera and lens combo that works well for their subjects and style. If it’s the same camera and lens, same lighting, same place in front of the background, having the camera in the same place on a sturdy tripod make a lot of sense.

An onsite portrait shoot can receive the same treatment. A fancy dinner ball, a high school or college reunion, even a prom… the photographer can set up everything and have people lined up all night long. Group portraits, like in a corporate setting, benefit as well.
Videography, Vlogging & YouTube
I’ve been concentrating on still photography so far, videos are also an aspect of photography where using a tripod can sometimes make a great difference in the final results. Videography, vlogging, and YouTube videos are huge right now. Whether used to make money, to help promote a cause, or just for fun, videos are a fantastic way to engage an audience.

One of the things in videos that almost immediately take me out of enjoying them is that jerky, shaky, unsteady camera view. Shaky Cam, I call it. Bleah! Unless it’s being used for a specific effect in a major motion picture, I find shaky video virtually unwatchable. Put that video camera on a tripod, please!
How To Setup Your Camera and Tripod For Photography
I have the tripod, now what? It might feel a little intimidating to some people to set up a tripod the first few times. After using your new tripod for a while, however, it will become virtually second nature to you.
We’ll just go over the basics of set up and use. If you’re already familiar with tripod use, that’s good. Thanks for creating awesome images and videos. Seriously. I enjoy seeing what other creatives do for fun and work.
1. Take Your Tripod To The Chosen Location
First, let’s carry our tripod to wherever we’re going. Maybe we strap it to a backpack for a hike, or we use a bag to transport it to the on site location we’re photographing that day. Or maybe we’re just taking it from the closet of photo stuff to the studio in the next room. Once we get there, we unfold the legs.
2. Unfold The Tripod Legs
Unfolding the legs in some situations is more straightforward than in others. In a studio or on a relatively flat surface, just unfold. On uneven ground we might want to adjust the angle of the leg spread for one or more legs. Many of the tripods on the market have the ability to set different angles of leg spread. Often that is accomplished by means of a control near the pivot point of the legs.

On this one pictured, I press in a latch at the top and spread to a different lockable angle.
3. Adjust The Tripod Legs To Your Desired Height
Adjustable leg spread can also be useful for getting the camera closer to the ground or to an oddly positioned subject. In addition to spreading the legs out, I might be able to reverse the center column and mount the camera underneath the tripod. As pictured here, I can get my micro lens right up to the subject without any awkward contortions on my part. When reversing the center column, it helps to have a very adjustable 3 way head. More on that head in a moment.

Depending on what I’m photographing, I will place the legs with regard to where I’m standing differently. If I need to get up close to my subject, such as in small product photography, I will place the legs with two of them near the subject and one pointing back towards me.
In a set up for portrait photography or landscapes, I often have the one leg pointing towards the subject, allowing me to get between the other two legs. After a while, that decision will come naturally depending on what you’re doing.
4. Mount Your Camera To The Tripod
I need to mount my camera and lens to the tripod. Usually found on the bottom of the camera, the tripod socket is what’s used. For most cameras and lenses, the socket is 1/4” 20 pitch, often labeled as simply 1/4-20. A 3/8” thread is sometimes used on larger photographic or scientific equipment and is also the standard for mounting many interchangeable heads onto higher end tripod legs. The mounts to the camera on those heads will normally still be the 1/4-20.
One of two ways is most common to attach the camera to the tripod. One way is a screw thread on the tripod head. Another way is via a quick release mount. Using the first type, we merely screw the bolt into the socket and snug it down.

With a quick release, we first attach the plate to the camera or lens and then mount the plate to the tripod head. There are a few somewhat standardized quick release systems in use, but many tripod manufacturers will have their own proprietary systems. Whenever mounting with either method, it’s important to not over tighten.
Many times, we want to bear down with all our might to make sure things won’t move, but anything beyond finger tight raises the possibility of causing damage to our equipment. Trust me, most mounts are designed very well to snug down just fine and remain immovable throughout the photographic session. Especially is this important to remember when using some of the fine cameras out today that are made from lighter weight materials.
5. Adjusting The Tripod Head Or Tilt Head
Tripod heads are varied as well. A pan and tilt head is very common on smaller tripods and on lower cost tripods. A basic pan and tilt head can be used for a variety of photographic needs. There is generally one control that can be used for tilting up and down and for panning from side to side.

There normally is also a way to flip the camera rig to a vertical (portrait) orientation. The way I usually use a pan and tilt is to leave the panning base unlocked and use the tilt control wand for both movements. The tilting feature generally locks and unlocks by twisting the control wand itself.
6. Adjust The Ball Head
A ball head might more correctly be called a ball and socket head, but us photographers don’t like superfluous words, so we call it a ball head. The ball head can be used with one control, the lock and unlock control for the ball and socket. Many ball heads also have a separate panning base with its own lock, but for the uses I have for these heads, I tend to leave the panning base locked and adjust the camera and lens with just the ball and socket.

Ball heads are most useful, in my opinion, on monopods and mini tripods. When at a sports event, using a long lens, but still needing to be quickly mobile in addition to offering support, I like using a monopod with a ball head. Ball heads can be made very small but some are quite large and robust.
Side Note: Adjusting Other Types Of Heads
A fluid head is a specialty head primarily designed for video and movie cameras. A fluid head has movements dampened by a heavy fluid, often some type of oil. The advantage of this is that the panning and tilting movements are smooth and even. Any time a film maker has to move the camera during actual filming, a fluid head lets this be done in a way that is hardly noticeable.
Geared heads can be made in various configurations, but are generally designed with video and movies in mind, or is a form of three way heads. Geared heads are often heavy duty and they have a cost in size, weight, and dollars that is fairly high. Besides video, a geared head might also be handy in a studio set up for product photography.
7. Adjusting A 3 Way Head
The three way head is possibly my favorite type. Very versatile and easy to use, they can be found in small versions and larger, heavier duty varieties. A three way head is able to be set up in almost any orientation needed. A three way head attached to a versatile medium duty set of legs is what I am carrying most of the time. Whenever I find myself inverting the center column under the tripod, using a three way head makes the set up both usable and easily adjusted.

Three way heads are also readily leveled out for use with panoramic mounts and any extreme wide angle lens. The best three way heads for my needs have large levers or knobs for locking and unlocking the movements. As already mentioned, there are also geared heads with the three way configuration that I feel are primarily usable in studios.
8. Using A Bubble Level
Any of these heads might have a quick release mount or be mounted with a fixed screw bolt. I feel that my rig is most stable when I level out the legs first as close to level as possible, and then use the heads for fine tuning and for any necessary movements. A bubble level that can be fitted to the camera is helpful for those situations that I have the time to be that precise in my set up. Other times, I can eyeball it pretty well. Some tripod heads have bubble levels built into them.

At other times, I find that I need to secure the entire rig a little better. Maybe it’s one of those windy days and I’m using a rather large camera and lens. Some tripods have hooks below the center column that make it easy to add a weight, such as a sandbag. Alternately, weight can added to each leg when needed.
9. Setting Up A Remote Shutter
Using a tripod makes me pull out my remote releases for triggering the camera. In the old days of all mechanical cameras that took film, a cable mechanical release was that tool. Motorized cameras may have had electronic releases back then, now electronic releases are the norm. An electronic release can attach via a cord of various lengths, or wirelessly.
A wireless remote can be either infrared or radio. IR releases are like a TV remote control, you have to have a clear line of sight and the range is often somewhat limited. Adequate for most situations in which I find myself using a tripod. A radio remote can be triggered from a location that does not have a direct line of sight or may be some distance away.

Besides nature subjects, a radio remote can be very useful in a photo studio for either product or portrait photography. If I have all my settings preset or on auto, I can be away from being behind the camera. Pet photography, young kids, or fashion images may benefit from this. A product shoot with multiple items can go quickly if I don’t have to sit behind the camera.
We don’t have to be a professional photographer to gain benefits from a tripod, however. Anyone wanting sharper images in various situations might find a tripod to be one of the most valuable tools in our equipment case. Examine your portfolio of images and videos. Where could you have a tripod for better results? Do you need a heavy duty, large tripod? Or might you find some sort of travel tripod more usable?
10. Setting Up A Panoramic Tripod Rig
Maybe you are like many of us and could get good results from a having a couple of different choices available to us. For instance, a larger tripod provides great support for longer lenses (figure 10) or for panoramic rigs, while a smaller tripod is ideal for traveling in a busy tourist area.

Besides photographic and video uses, we might find a tripod to be invaluable in our use of spotting scopes for hunting or as a support for our telescope or binoculars when viewing the wonders of outer space.
Please, don’t be intimidated by tripods. They are not monsters. Except for those giant Martian machines that Wells warned us about. Choosing the best tripod for you and then learning how to set it up will generally result in sharper images and more viewable videos. Enjoy!